I have a odd question about drawing a texture image on the screen. I want it to be in the small position on the screen no matter rotation, angle or anything of the camera.
Say I want it to display in the top left corner of the screen and I want it in the sky bucket (not on the gui), to draw behind everything.
I don’t want the camera position, angle or rotation to affect it. I want this image to be drawn on the screen all the time unless the terrain covers it up.
Don’t want it to be a cube, just a simple quad, that is draw no matter what.
If this were my project, I’d probably handle this by attaching the quad to its own Viewport, created by invoking RenderManager.createPreView(). Then I’d disable clearing the buffers of the main viewport.
Each Viewport has its own Camera, so movement of the default Camera shouldn’t affect custom viewports. Does that make sense?
I understand some of it. I use frame buffers for my game, I have a gui and a perspective frame buffers with their own viewport.
If you say the possible following.
Create viewport (same size of nor rendering) for this special non-camera viewport.
Create viewport for my normal rendering.
take texture of the special and render it to the gui.
then take the texture for the normal rendering and render it to the gui.
End result is would be 2 layers of texture and the first one not having a camera adjustments applied to it.
As I said, every viewport has its own camera, so there’s no such thing as a non-camera viewport.
The new viewport would be a background, not a gui.
SimpleApplication includes a GUI viewport, but that viewport is what’s called a “post view”, not a “pre view”, meaning it’s rendered after the main viewport instead of before.
import com.jme3.app.SimpleApplication;
import com.jme3.material.Material;
import com.jme3.material.Materials;
import com.jme3.math.ColorRGBA;
import com.jme3.renderer.Camera;
import com.jme3.renderer.ViewPort;
import com.jme3.renderer.queue.RenderQueue;
import com.jme3.scene.Geometry;
import com.jme3.scene.Mesh;
import com.jme3.scene.Spatial;
import com.jme3.scene.shape.Box;
import com.jme3.scene.shape.Quad;
import com.jme3.texture.Texture;
import java.util.List;

public class Main extends SimpleApplication {

    final private static String backgroundViewportName = "background viewport";

    public static void main(String[] args) {
        new Main().start();
    }

    @Override
    public void simpleInitApp() {
        /*
         * SimpleApplication creates 2 viewports:
         * 1. the default viewport (rendered first, after clearing all buffers)
         * 2. the GUI viewport (rendered last, without clearing any buffers)
         *
         * Create a 3rd ViewPort, named "background viewport",
         * to be rendered BEFORE the default viewport.
         */
        Camera backgroundCamera = guiViewPort.getCamera().clone();
        ViewPort backgroundViewPort = renderManager.createPreView(
                backgroundViewportName, backgroundCamera);
        /*
         * Don't clear the color buffer before drawing the main ViewPort.
         * Clearing the color buffer would hide the background.
         */
        boolean clearColorBuffer = false;
        viewPort.setClearFlags(clearColorBuffer, true, true);
        /*
         * Create a quad to display the JMonkeyEngine logo,
         * assign it to the Gui bucket,
         * and attach it to the background viewport.
         *
         * (If the logo image is unavailable, substitute your own image.)
         */
        Texture quadTexture
                = assetManager.loadTexture("Interface/Logo/Monkey.png");
        Material quadMaterial = new Material(assetManager, Materials.UNSHADED);
        quadMaterial.setTexture("ColorMap", quadTexture);

        float quadHeight = backgroundCamera.getHeight();
        float quadWidth = backgroundCamera.getWidth();
        Mesh quadMesh = new Quad(quadWidth, quadHeight);

        Spatial quadGeometry = new Geometry("quad geometry", quadMesh);
        quadGeometry.setMaterial(quadMaterial);
        quadGeometry.setQueueBucket(RenderQueue.Bucket.Gui);
        backgroundViewPort.attachScene(quadGeometry);
        /*
         * Create a green cube and attach it to the default scene.
         */
        Material cubeMaterial = new Material(assetManager, Materials.UNSHADED);
        ColorRGBA cubeColor = ColorRGBA.Green.clone();
        cubeMaterial.setColor("Color", cubeColor);

        float cubeRadius = 1f;
        Mesh cubeMesh = new Box(cubeRadius, cubeRadius, cubeRadius);

        Geometry cubeGeometry = new Geometry("cube geometry", cubeMesh);
        cubeGeometry.setMaterial(cubeMaterial);
        rootNode.attachChild(cubeGeometry);
        /*
         * Speed up camera motion for convenience.
         */
        flyCam.setMoveSpeed(8f);
    }

    @Override
    public void simpleUpdate(float timePerFrame) {
        /*
         * Since SimpleApplication is unaware of the background viewport,
         * the application must explictly update its scenes.
         */
        ViewPort bgViewPort = renderManager.getPreView(backgroundViewportName);
        List<Spatial> scenes = bgViewPort.getScenes();
        for (Spatial scene : scenes) {
            scene.updateLogicalState(timePerFrame);
            scene.updateGeometricState();
        }
    }
}
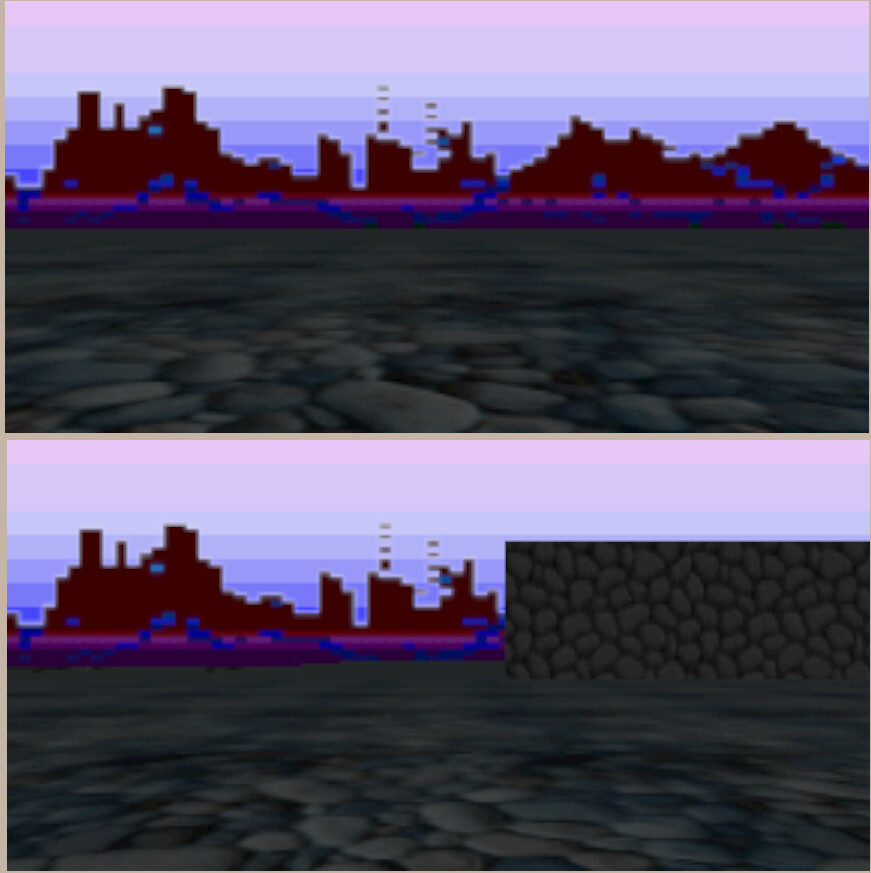
Thanks for all the help. That allowed me to know how to handle my own skybox.
I needed a layer for sky, Sun, background (Mountains) and then on top of mountains, more images that are animated (Water fall).
My game is an pixel art remake of an 80s game and I’m converting it from my own engine over to JME.
First picture is a test of a floor with my sky, mountains, sun, and water fall (not all in picture) and take that texture and assign it to a the texture output of a framebuffer.
I render my perspective view to a frame buffer not to rootNode. So I assign the output of the createpreview texture from my sky createpreview framebuffer to my main game 3d view frame buffers output.
It works out create, it is simple. This way I can apply the many geometry (since my entire game is pixel art using sprite sheets).
Thanks for all the help. This was the one area that was causing me to think about how to do it in JME. In my game, it was easy since I was writing it, so I could not apply camera and display it to basically a gui layer (jme style).
FWIW, if I’d known you were creating a 2-D game, I would’ve suggested putting everything in the GUI viewport, using a different Z value for each layer.
Its not a true 2D game nor a true 3D game. It is a combo. The city/dungeon walls are placed on a quad and put into a 3d world with floors and ceilings. But NPC, items and such are all 2D billboard items. Think of those early 3D games like doom.
I used lighting and normal mapping to create a little visual effects. Also, you have the ability to turn on advanced game place to not play the original game. That version of the uses some models but still a combo of 2d/3d game play.
Thanks for everything. I image I will have more questions, as I convert more and more over. It is a large project to convert.
The only thing I would not figure out is that when define a window size, inside JME is configuring the camera size to create a physical window.
But inside opengl you have a window size and a canvas size. But JME prevents you from doing this.
You basically could create a window of 500x500 but could define the canvas size of 100x100. Opengl will automatically scale the graphics to fit the 100x100 into a 500x500 and draw it correctly.
This way you can control your graphics and viewports resolution.
I miss having this option.
JME is a lot more flexible that you seem to believe. Perhaps you’re getting confused by the nomenclature.
In JME, the display window is created first, then the cameras. Both can be configured by the application to be any size you want. SimpleApplication initializes the GUI camera’s height and width to match the display, but this is purely for convenience. (GUI developers are accustomed to thinking in terms of pixels.) There’s a lot of flexibility.
For instance, if you have a 500x500 display window, you can create a quad that’s 100x100 for your “canvas” and zoom the GUI camera in so that the quad fills the window. Or you can create a “canvas” that’s 1000x1000 and move the GUI camera around to control which part of the canvas is rendered. You can also create split screens, where each quarter of the display is a separate viewport with its own camera and scene graph.
I tried all kinds of things to change the canvas size but the canvas size gets updated by JME after the SimpleApplication initializes not before. Unless I’m doing something wrong, it gets over written if you change it in the initialization method.