Hi everyone,
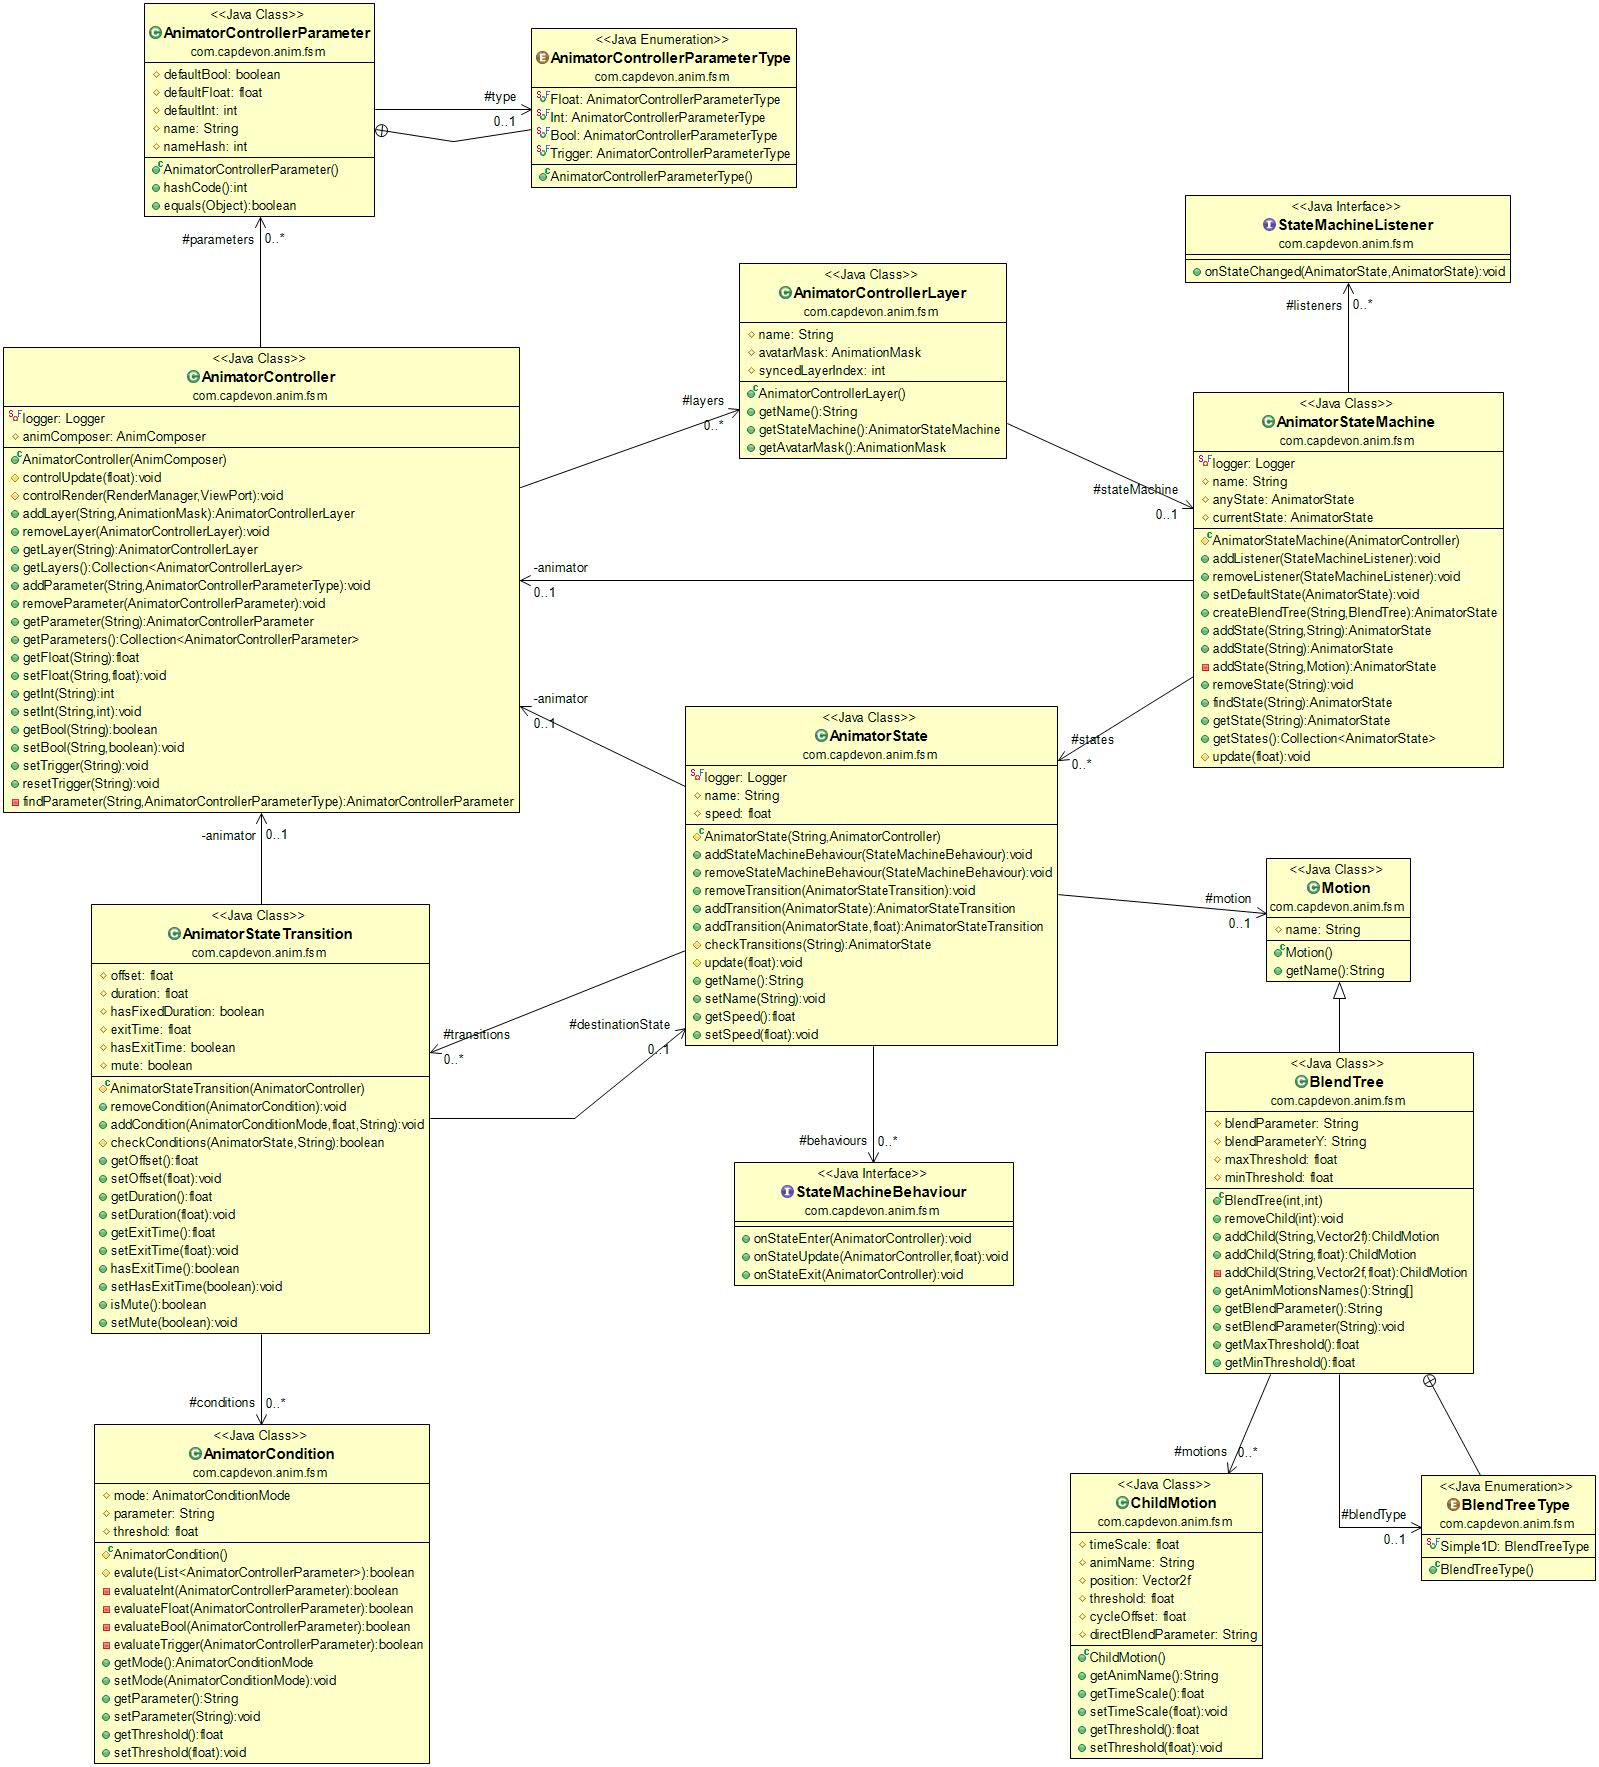
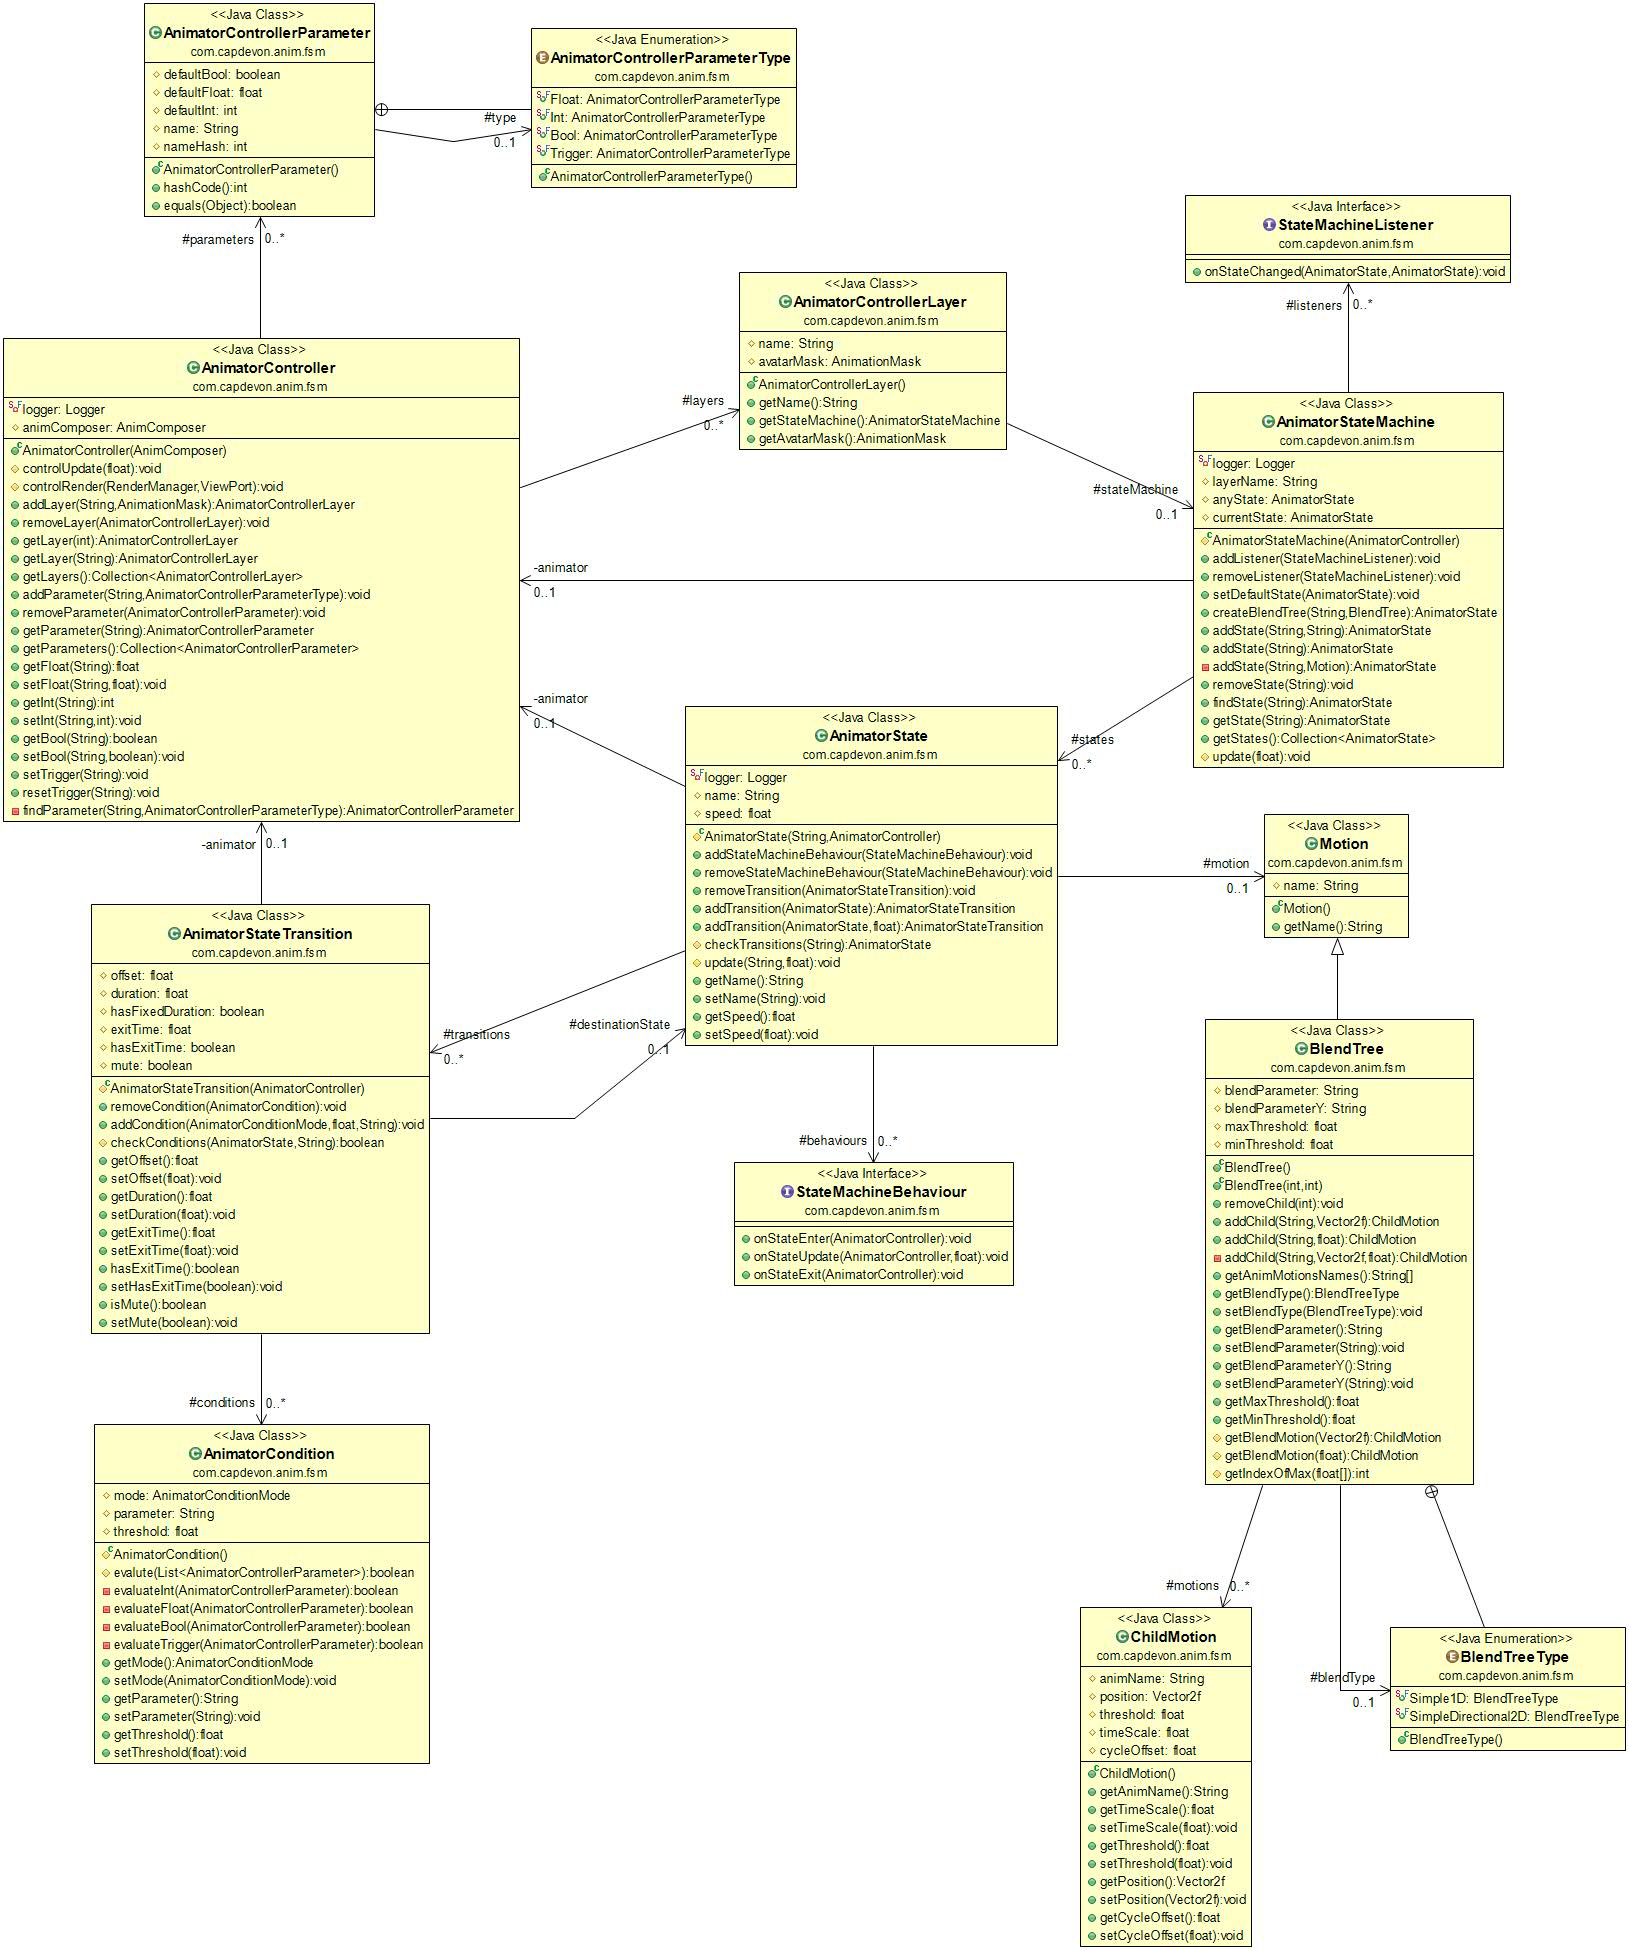
I uploaded the new features to github. New class diagram:
Let’s talk about the technical details after the video:
+Shoulder camera.
+Dynamic FOV when aiming.
For the implementation of the BlendTree 2D, I used as a reference the source code of the Godot Engine which is completely free. Not having a graphic editor, I discarded the functions that involved the use of the Delaunay tringulation algorithm. Maybe I’ll add it later.
When to use this system:
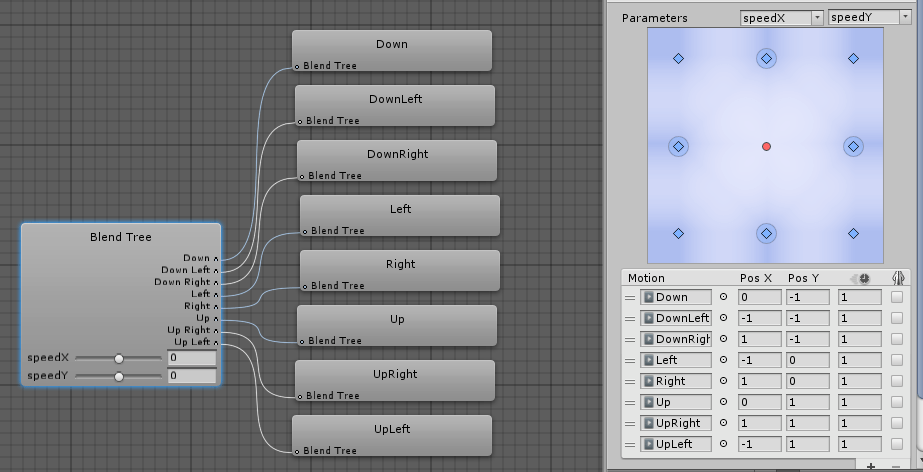
"Used when your motions represent different directions, such as “walk forward”, “walk backward”, “walk left”, and “walk right”, or “aim up”, “aim down”, “aim left”, and “aim right”. Optionally a single motion at position (0, 0) can be included, such as “idle” or “aim straight”
After setting the Blend Type, the first thing you need is to select the two Animation Parameters that will control this Blend Tree. In this example, the parameters are velocityX (strafing) and velocityZ (forward speed).
The positions in 2D blending are like the thresholds in 1D blending, except that there are two values instead of one, corresponding to each of the two parameters. Their positions along the horizontal X axis correspond to the first parameter, and their positions along the vertical Y axis correspond to the second parameter. A walking forward animation might have a velocityX of 0 and a velocityZ of 1.5, so those values should be typed into the Pos X and Pos Y number fields for the motion."
// Create the controller and the parameters
AnimatorController animator = new AnimatorController(animComposer);
animator.addParameter("velocityX", AnimatorControllerParameterType.Float);
animator.addParameter("velocityZ", AnimatorControllerParameterType.Float);
player.addControl(animator);

AnimatorStateMachine sm = animator.getLayer(0).getStateMachine();

BlendTree tree = new BlendTree();
tree.setBlendType(BlendTreeType.SimpleDirectional2D);
// Configure the name of the parameter that controls the mixing of animations.
tree.setBlendParameter("velocityX");
tree.setBlendParameterY("velocityZ");
// Configure the animations and their position in the 2d graph
tree.addChild("IdleAiming", new Vector2f(0, 0));
tree.addChild("Move_FW", new Vector2f(0, 1));
tree.addChild("Move_BW", new Vector2f(0, -1));
tree.addChild("Move_L", new Vector2f(-1, 0));
tree.addChild("Move_R", new Vector2f(1, 0));
tree.addChild("Move_FWL", new Vector2f(-1, 1));
tree.addChild("Move_FWR", new Vector2f(1, 1));
tree.addChild("Move_BWL", new Vector2f(-1, -1));
tree.addChild("Move_BWR", new Vector2f(1, 1));
// Create the state from the blend tree
AnimatorState walk = sm.createBlendTree("BlendTree-Walk", tree);

// set the initial state.
sm.setDefaultState(walk);
Now in your PlayerMovementControl you can control animations through the parameters defined in your AnimatorController.
    public class PlayerMovementControl extends AbstractControl implements ActionListener, AnalogListener {

        public float m_MoveSpeed = 1.8f;
        public float m_TurnSpeed = 2.5f;
        public BitmapText crosshair;

        private Camera camera;
        private AnimatorController animator;
        private BetterCharacterControl bcc;
        private final Vector3f walkDirection = new Vector3f();
        private final Vector3f viewDirection = new Vector3f(0, 0, 1);
        private boolean _MoveForward, _MoveBackward, _StrafeLeft, _StrafeRight;

        private MainCamera _MainCamera;
        public float nearClipPlane = 0.01f;
        public float farClipPlane = 100f;
        private float fov = 0;
        private float aimingSpeed = 5f;
        private float aimFOV = 45;
        private float defaultFOV = 60;
    	boolean isAiming;

        /**
         * Constructor.
         * @param app
         */
        public PlayerMovementControl(Application app) {
            this.camera = app.getCamera();
        }

        @Override
        public void setSpatial(Spatial sp) {
            super.setSpatial(sp);
            if (spatial != null) {
                this.animator = spatial.getControl(AnimatorController.class);
                this.bcc = spatial.getControl(BetterCharacterControl.class);

                _MainCamera = new MainCamera(camera, defaultFOV, nearClipPlane, farClipPlane);
            }
        }

        @Override
        public void onAnalog(String name, float value, float tpf) {
            // TODO Auto-generated method stub
        }

        @Override
        public void onAction(String name, boolean isPressed, float tpf) {
            if (!enabled)
                return;

            if (name.equals(InputMapping.MOVE_FORWARD)) {
                _MoveForward = isPressed;
            } else if (name.equals(InputMapping.MOVE_BACKWARD)) {
                _MoveBackward = isPressed;
            } else if (name.equals(InputMapping.MOVE_LEFT)) {
                _StrafeLeft = isPressed;
            } else if (name.equals(InputMapping.MOVE_RIGHT)) {
                _StrafeRight = isPressed;
            } else if (name.equals(InputMapping.AIMING)) {
            	isAiming = isPressed;
            	crosshair.setCullHint(isPressed ? CullHint.Never : CullHint.Always);
            }
        }

        @Override
        protected void controlUpdate(float tpf) {
            // update physics
            walkDirection.set(0, 0, 0);
            float hSpeed = 0;
            float vSpeed = 0;

            if (_MoveForward || _MoveBackward) {
                Vector3f dz = spatial.getWorldRotation().mult(Vector3f.UNIT_Z);
                vSpeed = _MoveForward ? 1 : -1;
                walkDirection.addLocal(dz.multLocal(vSpeed));
            }

            if (_StrafeLeft || _StrafeRight) {
                Vector3f dx = spatial.getWorldRotation().mult(Vector3f.UNIT_X);
                hSpeed = _StrafeLeft ? -1 : 1;
                walkDirection.addLocal(dx.multLocal(-hSpeed));
            }

            walkDirection.normalizeLocal();
            bcc.setWalkDirection(walkDirection.multLocal(m_MoveSpeed));

            // update view direction
            Vector3f lookDir = camera.getDirection();
            lookDir.y = 0;
            lookDir.normalizeLocal();
            Quaternion lookRotation = FRotator.lookRotation(lookDir);
            spatial.getLocalRotation().slerp(lookRotation, m_TurnSpeed * tpf);
            spatial.getLocalRotation().mult(Vector3f.UNIT_Z, viewDirection);
            bcc.setViewDirection(viewDirection);

            // update animation
            animator.setFloat("velocityX", hSpeed);
            animator.setFloat("velocityZ", vSpeed);

            updateWeaponAiming(tpf);
        }

    	private void updateWeaponAiming(float tpf) {
    		if (isAiming) {
    			fov += tpf * aimingSpeed;
    		} else {
    			fov -= tpf * aimingSpeed;
    		}

    		fov = FastMath.clamp(fov, 0, 1);
    		_MainCamera.setFieldOfView(FastMath.interpolateLinear(fov, defaultFOV, aimFOV));
    	}

        @Override
        protected void controlRender(RenderManager rm, ViewPort vp) {
            //To change body of generated methods, choose Tools | Templates.
        }

    }
This animation management system with other much more advanced features is present in all engines such as Unreal, Unity and Godot.
Let me know if you like it.
Have fun