I was admiring the wonderful work of @pspeed on Mythruna, particularly the books which have UI rendered on them.
Is there a tutorial somewhere on how to use Lemur with 3D spatial objects? I’m very interested in rendering text, graphics and UI on books and other animated/moving 3D objects.
I wonder how Paul projects the UI on the book, does he render it to texture?
What would be the ideal book page thickness? Is it just a flat plane with some shader magic or would you need to use specific thickness to get around rendering issues?
The book uses a few tricks but the trickiest parts are already in Lemur.
The book halves are MBox meshes that are subdivided enough so that the DMesh has something to work with. Then I just mess with the curvatures and things until I got something I liked. That’s why I can animate the book opening and closing.
The page is just a plane but it doesn’t show up unless the page is turning. So, normally if you are viewing page 1 left, page 2 right… those pages textures are rendered right on the book half. When the page is turning, I add the warping page with page 2 on one side, page 3 on the other… and page 4 on the right book halve. Once the page is done turning then I get rid of it and put the page 3 texture on the left half of the book.
It’s a bit of fancy footwork.
The UIs themselves are rendered to a texture with each possible page taking up one quarter of the total area. I add a Lemur cursor listener to the book halves so I know where they were clicked and I turn that click location into texture coordinates. I then have a Lemur PickEventSession that I send the events to so that it can dispatch them to that offscreen UI.
So, as I said, the hardest parts are all standard Lemur stuff… but the wiring it up can be tricky and time consuming. Worth it in the end, I think.
We haven’t been able to work on this yet because of other things which took priority, but they are now done.
So, is it strictly necessary to do the page turning animation via code, or would Lemur be able to handle a book that has been rigged and animated with normal keyframe animations?
After showing the page turn animation we’d just reset the book back to a default position. And if the player wants to turn the page to the other direction, we’d switch to a different position in the animation which would be followed by the reverse page turning animation.
From my perspective - if Lemur can handle that - it would give us much more control over the animation than trying to do it via code would.
The added benefit from being able to use rig + keyframe animations would be that we could do a book where the thickness changes as you turn the pages. So it would actually look like you’re reading through the book.
What I would like to do, is take a cube and put an interface on every of the six sides. By rotating the cube players can switch to any of the desired interfaces. Something like this:
I think this would be a clever solution to the problem of very little room and the need for quite some controls to set world parameters, survival and reproduction treshholds, statistics and more.
I might even later on want to put the interfaces on a sphere. Just to keep them in style.
In my case, I think for rendering to a texture I just used the standard JME examples. I think registered a Lemur cursor listener with my surfaces and used that to forward the events to the pick event session associated with the rendered view.
I’d have to do some digging to find my code. Let me know if you can’t figure it out and I’ll try to find exactly how I did it. (It was like 6 years ago or something.)
My first guess would be to setup a dedicated scene for the Lemur stuff, and make the camera render to an Image or Texture.
Not sure how that would work, it looks like the FrameBuffer of the viewport can be turned into a texture with some steps.
I 'm curious if that would perform well enough. It will involve feeding the GPU a new texture every update. That might be costly for the CPU. Since it is all in-game I desperately need the cycles for the brains of around 200 little guys.
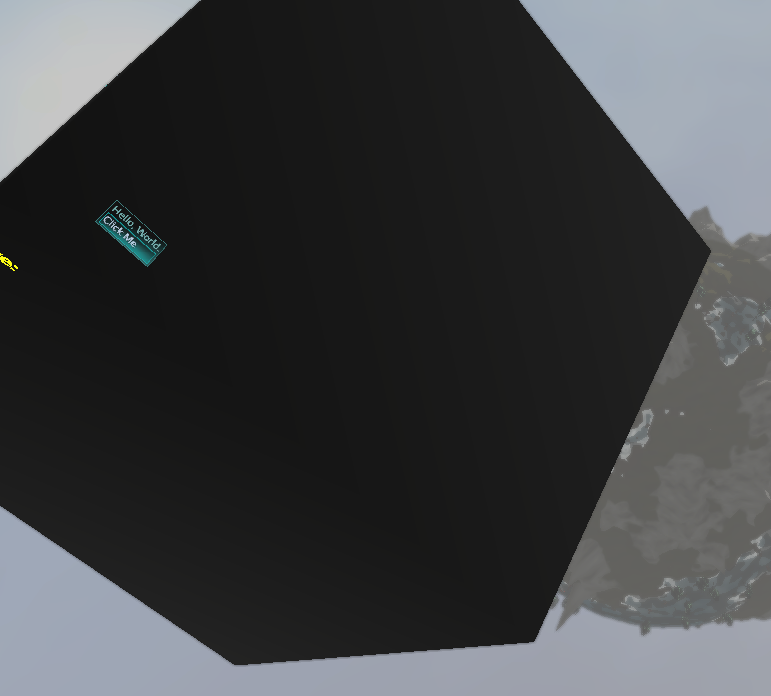
What you see is a massive unshaded cube with the gui as a texture on it. As you can see I used the simple example of the Lemur Getting Started section.
Here is how I did it: first I replaced the Framebuffer of the GuiViewport with a custom FrameBuffer that I gave my texture as a RenderBuffer:
Then I created a gui to be drawn.
Then a box that I gave an unshaded material with my texture
Every cycle I have the rendered texture sent to the GPU like this:
setColorTexture was deprecated recently. Very anoying. No clue how to work around that for now.
The standard cube JME3 provides uses the same uvs on all the six sides. I need the sides to each use a different part of the texture. I may have to create a custom mesh to solve that.
I need to find a way to keep the cube in the right top corner of the 3D viewport.
I recommend that you create your own separate viewport with its own root for this cube instead of messing up the guiNode. There is nothing particularly special about either except that the guiNode is in the Gui bucket.
…that way the real guiNode is available if you need it for classic overlays or even able to popup the standard HUD debug stuff that JME provides.