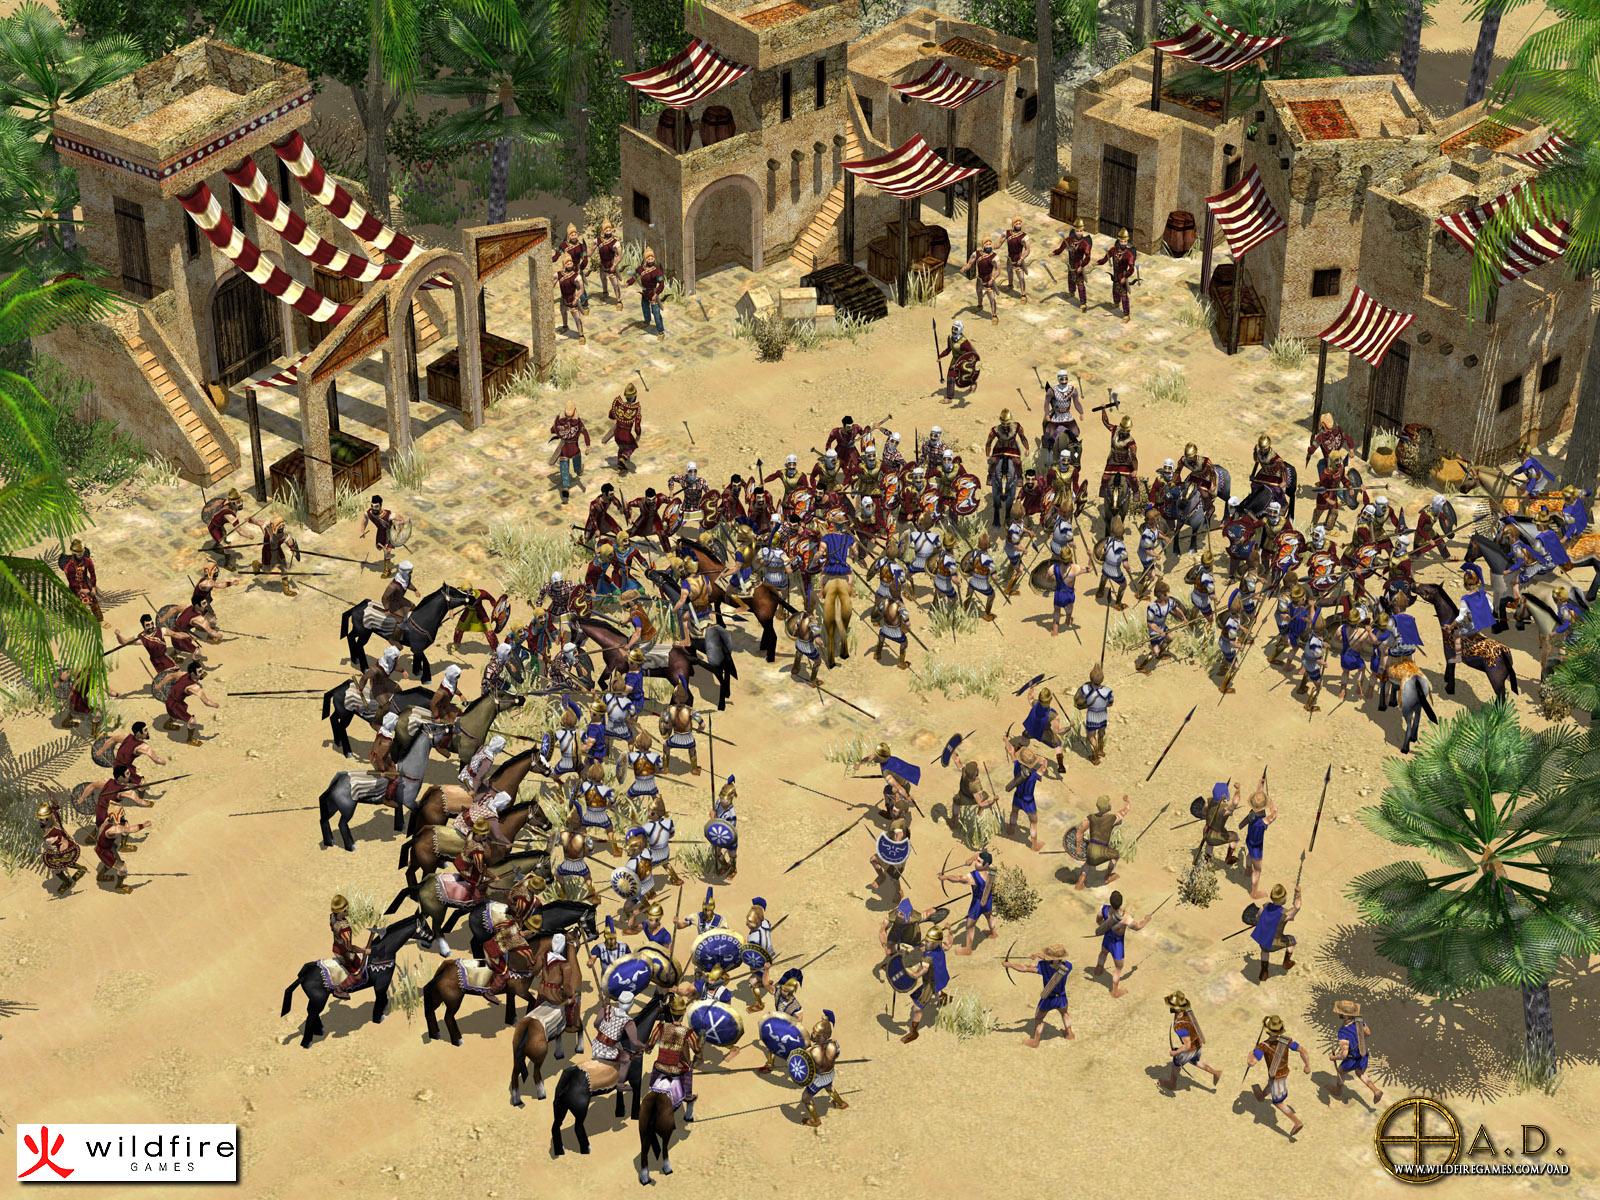
New visual of the engine. New video soon !

New visual of the engine. New video soon !
Pretty!
And here is the promised video.
Hope you’ll like it, it is the result of about 300 hours of work since last august.
")
Fantastic work, so great to see what people like you manage to do with the engine!
Really impressive. I like a lot the new visual.
Wow, this editor looks amazing.
After so much hard work the results looks really very good.
Amazing!
Awesome! 
Beatiful! really.
Thank you for all your encouraging messages ! Don’t hesitate to like and comment the video on youtube, it helps.
I think that the project as come to a stage. Now it needs some content to continue and I don’t know if we will have the courage to create it. From now, it must accelerate or stop completly.
We will see what happen 
What?? You did the “hard” part and think of stopping before starting the “fun” part?
Please either finish the game or release a jMonkey plugin of it! ![]()
Remember that the goal was to make an RTS game engine, not a single finished game. The “hard” part was the most interesting for me and there is a gazillion of things to do to make something workable.
To create an engine, I guess I have to build at least a “test game” too. To be confronted to the real needs. To discover the essential features it has to have.
So yes, the solution may be to put it on a public Github repository, or to publish it as a jMonkey plugin and let the interested persons make that work. But for that, I have gazillion of doc to write ![]()
That’s reality browski! Do eeeeeeet! Just do a simple repo with your code first, no plugin. Changes are coming on that front very soon.
Maybe after we’re done with the first jME Example Game we could see if anyone’s interested in taking the lead on a 2nd one using your RTS editor.
Hey @methusalah,I am working on a RTS game of my own.
(Sorry this being my first post I could not post the images)
Being a school student I am having some problems,since you said:
Can you help me with these implementations:
Please look at post no. 34
Hi
There are tons of implementation for a grid based map. My advice is to create
Map contains all exploring method. Here are the main :
getTile(x, y) returning array.get(y*width+x)
getNorth(tile) returning getTile(tile.x, tile.y+1), same with south, east, west (and if needed northWest, etc.)
get4Neighbors(tile) returning new array with getNorth(tile), getSouth(tile), etc.
get8Neighbors(tile)
get9Neighbors(tile), including tile
Tile should have it’s own getNorth, getSouth… it’s less verbose.
This basic structure allow you to explore the map without visiting all elements at each time.
Selection area is simple to implement with jMonkey. At mousePressed you store the ground coordinate pointed by the mouse, and at mouseReleased again, then you have a bounding box. You search in your unit list the units that lie inside. Later, you will want to deform this bounding box according to the camera frustum and to follow relief, but it’s not priority.
This is easely made with jMonkey, by extending the class ChaseCamera. You lock the mouse view, set cursor visible, set the camera angle and position and it’s done. Then you bind your WASD or arrows to affect x,y coords of the camera.
For more exemples : http://wiki.jmonkeyengine.org/doku.php/jme3:beginner:hellochasecam
If you need more info or piece of code, please contact me by PM.
God luck for your project !
Ben
Hi Methusalah,
I don’t know if you are still answering questions on this topic but I just came across this yesterday. What you’ve written is exactly what I’m trying to write for my own RTS game. I have a couple of questions I hope you can answer.
In your video I see that the wireframe grid changes height to match the rise of the cliff meshes. Is that grid used for calculating your flowfields?
How are you implementing the terrain painting? I know that the textures are seemless and your painting an alpha to reveal the different layers. Is the alpha channel one big texture? How big is it (2k x2k)? Assuming your using GLSL for your graphics, could you share your code or sections of it?
Do the cliff tops and ground share the same UVs? In other words, as you draw the cliffs on the map, does the tops aquire the same UV’s as the ground they replace?
I’m really interested in how you’ve written your editor on a technical level. Please consider posting more detailed info about things you’ve discovered along the way.
Thanks,
Stephen
Yes, the ground is made of tiles. Each node as a height to create relief, and each tile store a moving vector given by the flowfield.
jMonkey helps a lot with that : http://wiki.jmonkeyengine.org/doku.php/jme3:advanced:terrain, “Terrain Splatting” part. It explains all you need to know to draw the good texture at the good place. jMonkey can make a texture from a ByteBuffer. Here is my code to create a ByteBuffer from my layers :
    ByteBuffer res = ByteBuffer.allocateDirect(width*height*4);
    int firstMapIndex = index*4;
    for(int x=0; x<width; x++)
        for(int y=0; y<height; y++){
            int r = (int)Math.round(layers.get(firstMapIndex).get(x, y)) << 24;
            int g = (int)Math.round(layers.get(firstMapIndex+1).get(x, y)) << 16;
            int b = (int)Math.round(layers.get(firstMapIndex+2).get(x, y)) << 8;
            int a = (int)Math.round(layers.get(firstMapIndex+3).get(x, y));
            res.asIntBuffer().put(y*width+x, r+g+b+a);
        }
The tricky part is to create the atlas (the set of layers). At each coordinate, the sum of all layers must be between 0 and 1. Layers must be linked. Here is an exemple of this link :
private void increment(Point2D p, int layer){
    double valueToDitribute = incrementVal;
    ArrayList<DoubleMap> availableLayers = new ArrayList<>();
    for(DoubleMap l : atlas.layers)
        if(atlas.layers.indexOf(l) == layer)
            valueToDitribute -= add(l, x, y, incrementVal);
        else
            availableLayers.add(l);

    while(valueToDitribute > 0 && !availableLayers.isEmpty()){
        ArrayList<DoubleMap> unavailableLayers = new ArrayList<>();
        double shared = valueToDitribute/availableLayers.size();
        valueToDitribute = 0;
        for(DoubleMap m : availableLayers){
            valueToDitribute += subtract(m, x, y, shared);
            if(m.get(x, y) == 0){
                unavailableLayers.add(m);
            }
        }
        availableLayers.removeAll(unavailableLayers);
    }
}
private double add(DoubleMap map, int x, int y, double val){
    double rest = 0;
    double newVal = map.get(x, y)+val;
    if(newVal>255){
        rest = newVal-255;
        newVal = 255;
    }
    map.set(x, y, newVal);
    return rest;
}
Tricky.
In my code yes, when you place a cliff, the ground is “cut”, but it always uses the same mesh, the same texture atlas and the same UV space. It may be a problem with overhang cliff style, because the ground texture at the top and the bottom share the same 2D coord, and the same painting.
The most hard part of the editor was definitly the cliffs layout because there are tons of special cases. My main regret is to have placed cliffs on the tiles, not on the nodes. It has made everything much more complex (but also more permissive).
When I finally fully understood the mechanism, it was too late to easily refactor, so if you intend to create a cliffed tile map like Stracraft, I would hardly advise you to study that part very well ![]() I can provide more explanation if needed.
I can provide more explanation if needed.
Good luck with your project and do not hesitate to ask pieces of code.
Ben
Hi Ben,
Thanks for taking the time to get back to me.
In my current build I’ve got a set of basic building block meshes that form two levels of platforms and one level below ground that is unwalkable. I’m in the thick of writing the code to place the correct block on the grid based on whats already there. Not hard, but slow going. I can’t think of a way to make it procedural so I’m doing it brute force. A block is choosen based on the surrounding blocks, etc.
I’d like to get your thoughts on placing your cliffs on tiles verses nodes. What were the pros and cons?
I’ll try to be clear but it’s not garanteed ![]()
First a naming precision : I call node’s height the value that make the relief of the ground, and node’s level the elevation of a node regarding to neigbboring nodes, delimited by cliffs.
Blizzard’s approach :
Each node of the map has i’ts own level.
You can elevate one single node. Then you will have four cliffs: north-east, north-west, SE, SW. The cliffs will all have the same shape : salient.
If you want to elevate more nodes, they will be managed by group of four, snapped to pair rows and collumns of the tile map. See the left scheme above. The editor will also round the inner corners (“o” on the scheme).
The right scheme is impossible to do.
b b a a        x x x x x x
b b a a        x x x x x
  o b b            x x
    b b              x
The surrounding tiles will all have a cliff mesh, straight, corner or salient.
This approach has three advantages :
My approach :
The level is stored on the tile, and given to the four connected node. When you elevate a tile, you get 9 cliffs : NE, N, NW, E, W, SW, S, SE.
But you can elevate any tile regardless of the surrounding tiles. No snapping.
This approach allows any cliff path, especially good for narrow and tortuous canyons.
But it also generates bugs. In the video, you can see red blocks when sculpting cliffs. These are detected bugs that mus be manually managed. Look at that scheme for one of the many cases :
x x x x
x   x x
The empty tile needs a cliff, but the five surround elevated tiles ask for a different shape and there is no solution.
Also, in this approach, you doesn’t ensure to have grouped cliff and this lead to thin and repetitive elements. You will want to detect couple and triptych as well, but you will need more different shapes to cover every case.
Hope it helps !
Ben