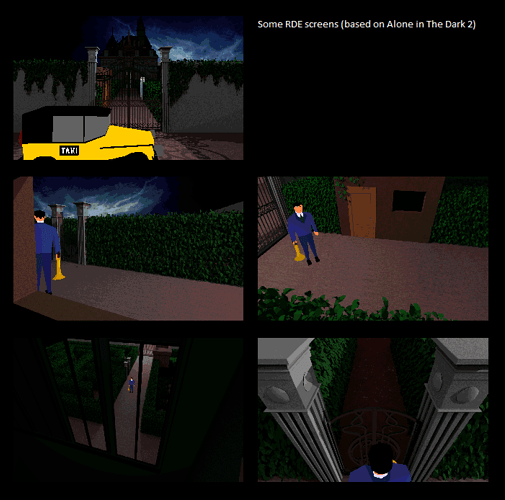
[RDE Project] 2.5D old-style engine

I’m really happy to introduce the project that I’m working in this last months.
RDE (Retro games Development Engine) is a little engine specialized for the creation of 2.5D retro games (with graphic style of
old Resident evil and Alone in the Dark).


History
The idea was born more than one year ago, where with a lot of trouble (almost all of them solved with your support) I created
a prototype with some base features, as fixed cameras, 3D models and 2D layers.
First prototype for simulate the 2.5D used only one 2D background for view, and a model with depth draw and no colour.
Solution was immediate but with a lot of troubles:

  • The model must had the same detail of the background (bad for performances and memory)
  • In this way background needs to be rendered after the model creation, was not possible to use other sources
    (for example and hand painted background), because needs to overlaps perfectly the model.

So after that I tried to remove completely the 3D component, except a very simple geometry for the collision detection (and obviously 3D entities).
Entities and layers (more than one for view, if there are some object not in the background) have a virtual depth value, for layers is static and for entities
it change based on the entity position, so some position “tell” to entities that they are behind than a certain layer, other tell that entity is before.
In this performances are very good (up to 500FPS in a mid low-end machine) and with a very low memory and space usage.

After that the problem was different, infact was too much difficult to build an high-level behavior over the prototype, so from here I started to think about a new
and flexible architecture. So I created a new project, keeping from the old only the base concept for 2.5D management.


RDE
The new solution manage each scene in a complete independent way. Each scene is totally configured by an XML.
The XML contains:

  • Information about base geometry (reference to base geometry assets, and handler class name for manage the geometry)
  • Information about entities (reference to each entity assets, and handler class name for manage the entities)
  • Information about cameras (reference to each cameras and handler class name for manage cameras)
  • Information about 2.5D handler (reference to each layer, depth values, walk sectors etc… and class name for manage 2.5D)
  • Information about the app state (appstate class name and additional information)

The config structure is flexible, and depends by:

  • parameters holder
  • config builder
  • handlers

A default set of handlers, config builder and parameters is present, but the abstraction level is high, so is possible to implement
a different set of own modules (for example if you want to manage the 2.5D in a different way, or if you want to add a default control to entities etc…).

For what concerns appstates in a normal way you should create a state class for each scene, but with default implementation this is not necessary,
infact every time you load a scene, a default app state is instanced and the initialize and update behavior are define inside a Groovy script (always referenced inside
the XML config).

In a nutshell… with the defautl configuration is possibile to create a 2.5D games only with Groovy scripts.

Inside the groovy script is also possible to call a set of common functions for some useful operation, for example creates new entities (from base defined in config)
add some GUIs, and switch to new scenes.
For this last point in particular I made the possibility to cache the scenes in asynchronous ways (using callable and futures), in this way the time gap between two
scenes is almost imperceptible.


Current State
This is the development state:

Core (Only Java)

  • Core Architecture → 100%

Default implementation (Only java)

  • Scene Building → 100%
  • Default 2.5D management → 100%
  • Default state management → 100%

Mid Level (Java and/or Groovy)

  • Collision management → 50%
  • Generic entities interaction → 0%

High Level (Mainly Groovy)

  • Particles → 0%
  • Entities actions → 0%
  • GUIs → 0%

So, as you can see core and default implementation are completed, lets move through the high level now!

I will start to release the first version when I will solve some simple bug, and complete the Mid Level tasks.

Hope you can find interesting I’d like to keep this thread up to date with all latest news.

Ray

2 Likes

Screenshots and/or videos please! :smiley:

1 Like

Screenshot? Just look at OP’s avatar :smile:

AITD2 :+1:

As you can see from status high level is still to implement, but I can provide some screenshot of the previous prototype (the graphical result is the same).
Now I want to work for a playable demo when mid-high level functs are finished :smile:

Some updates here:

Mid Level (Java and/or Groovy)

  • Collision management → 100%
  • Animation management. → 0%
  • Generic entities interaction → 20%

Animation will be very speedy to manage, In this case I will release at least a video very soon.

For collisions, system seems working well, and framerate is still high (Average ~500 fps)

Very interested in this… Every time I see it though I can’t help but feel we’re making the same thing lol

Yeah Jester, as I understood we are trying to obtaining more or less the same behavior. At the moment I’ve achieved good result, so if you need some kind of information I’m completely available. :smile:

PS. Of course when the “engine” will have a good status and flexibility I will release the source code and a short tutorial about the usage. At the moment the main tasks are complete, but I’m in the testing phease for discovering biggest bugs and fix them :smiley:

Just to give an idea of what you can do I remake the first screen of Alone in the dark 2 (1993) in 20 minutes (and this is difficult because I had to suppose the camera orientation in a second time from the original screen, but results are similar to original (with a easy player model made and animated from me).
I will release at leaat some screenshots (and I hope a video in a short time).
This means that if you have a rendering that overlaps your camera the procedure is very easy.

1 Like

Ok the engine is actually finished and seems quite stable, I’m working now on the gameplay. All these part will be made in groovy scripts. For now I created a short video using the same backdrops of AITD 2 (only 2 views) I hope I can upload it soon, but I want to create again by self some views with some my pre-rendered layers (with hand draw post editing)

3 Likes

Sounds cool. I’m at pretty much the same state now, creating new backgrounds. Blender cycles rendering time though, ugh…

In my case rendering is quite easy because I don’t need a so much realistic rendering (I want the same style of AITD trilogy) but the post editing with graphic pen will be longer :smile:
Jester at the end how you solved for camera?

I import a blend file into JME and get the camera from the blend file, so it’s the same camera as from the renderings (it gets the correct fov/sensor/whatever else).

Using that camera I chose my camera view in JME using my little editor, and print out the position and rotation. Then I just make set those values to the camera in blender and begin my render.

I found it easier to chose a good camera view when I can see the player walking around in-game. I have a 3d collision mesh so I just make that visible so I get a rough view of the scene.

What post editing are you doing? Sounds like it could take forever

Ah ok so you are using my same system, for sure is easier.
For post editing I mean that after the render I use the graphic pen to add an artistic touch to the render (for example enhance some shadows and light and smooth some surfaces) because the outcome I d like is to have backgrounds that seems hand painted. For sure is a bit lonher, but more or less I need 1 or 2 hours for each backdrop excluding the rendering (that is very fast in my case after composing the scene)

Ok a bit in late but I prepared some screenshot about a test scene that I created. My idea was to upload the video, but it’s too heave and I must reduce it, for now I start with screenshot.

Screen are made with rendering with blender, some post editing with photoshop (graphic pen is not used yet) and posterization + pixelation filter in jme3.

For screen I used a 320 x 200 res without the pixelation, otherwise native res would be 1280 x 800 with pixelation 4x.

5 Likes

I forgot to say that backgrounds (and front layers and mid layers) can also be animated (in the xml scene definition you can specify the sequence of images with the duration of each frame)

Looks really cool, I love the backgrounds. Especially the shot with the sky and the window shot.