Hello guys,
I’m currently trying to use own assets. For example a “metall.png” texture.
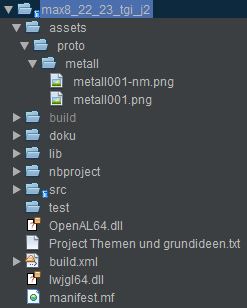
The path for that image is the following: [project folder]\assets\proto\metall\metall001.png
In order to load it, I tried the following code:
Material metall_mat;
metall_mat = new Material(assetManager, "Common/MatDefs/Light/Lighting.j3md");
metall_mat.setTexture("DiffuseMap", assetManager.loadTexture("proto/metall/metall001.png"));
In return in get the following error message:
Uncaught exception thrown in Thread[jME3 Main,5,main]
AssetNotFoundException: proto/metall/metall001.png (Flipped) (Mipmapped)
Now I don’t know what I’m actually supposed to do with the assetManager in order to get it to work. I heard about FileLocators before but that info alone doesn’t help.
Could you show us how your project is structured? A screenshot of the file structure might be suffice.
If you have your project on Github or similar, that would be easy as we could just take a peek what is wrong. Or just upload your project as ZIP and provide the link.
Can you give me a hint on how I would do such thing in a basic Netbeans project. My project wasn’t created with an initializer, but rather in netbeans alone.
As all of you said, I needed to add the asset folder to my class path.
I had no clue how to do it tho and what it actually means.
So I went ahead and asked ChatGPT:
I have an Ant-built project in Netbeans.
Whats the simplest way to add a directionary to the classpath?
Its response:
To add a directory to the classpath of an Ant-built project in
NetBeans, you can do the following:

1. Open the NetBeans project in which you want to add the directory to the classpath.

2. Right-click on the project in the "Projects" window
and select "Properties" from the context menu.

3. In the "Project Properties" dialog, select the "Libraries" category.

4. In the "Compile" tab, click the "Add Folder..." button.

5. In the "Add Folder to Classpath" dialog, navigate to the directory
you want to add to the classpath, select it, and click the "Select Folder" button.

6. Click the "OK" button to close the "Add Folder to Classpath" dialog.

7. Click the "OK" button to close the "Project Properties" dialog.

After you have completed these steps, the directory you added will be included
in the classpath of the project. Any classes or resources in that directory
will be available to the project during compilation and execution.
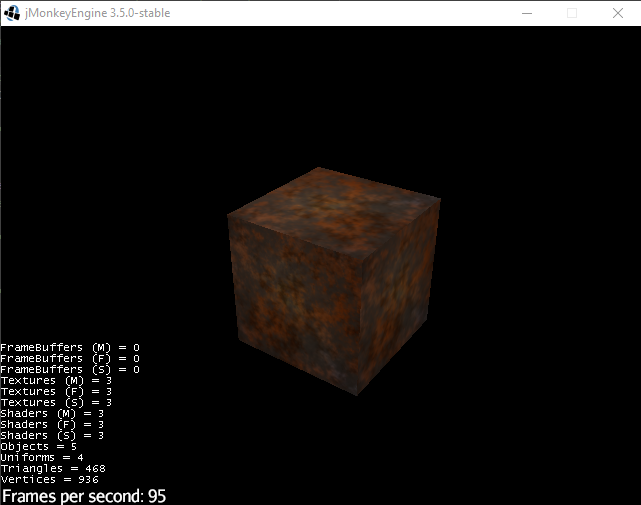
And see there my texture can be loaded without problems:
Material metall_mat;
metall_mat = new Material(assetManager, "Common/MatDefs/Light/Lighting.j3md");
metall_mat.setTexture("DiffuseMap", assetManager.loadTexture("proto/metall/metall001.png"));