Help texturing characters correctly

Hello everyone, the Dingo is back!

Right now, I’m working on a horror game, which will be announced when I make some good progress. But currently I am playing around with shader scripts to make the game have that Anime look. My goal is to take any 3D model and make it look like this (using a character as an example, but you get the point. Hopefully :smile: ):

I found a nice plugin that let’s me export materials in Blender to GLSL scripts, I am just having trouble finding a reference model that looks like the example that I can take the scripts from. So until I find one, it’s just test things and see what happens. I could take a normal model and play with the material settings until I get the desired effect…
This is where I ask for help. Does anyone know if there is already a shader script out there that does this? Or do you guys have any example of your own? Or how about that reference model I desperately need that doesn’t cost $100 (free is preferred)? I’m going to see what I can get on my own, but it feels nice having a bit of support. The first person to come up with a good solution will be given a virtual pat on the back and will be credited in my game.

Until the next reply / update / whatever, Sayonara!

After a bit of experimentation, I have managed to get close to the desired effect by only playing with the texture files. My test subject: A Toad model I messed up a while back. Here is the result:


There’s only one problem. In game, the model looks REALLY messed up and nothing like it does in the SDK viewer. Here’s what I mean:

See what I mean? So messing with textures isn’t going to work. But do you guys get the idea of what I’m trying to do? Is there a method to get this effect, or make it so the game looks exactly like the editor? I mean, what’s the point of having a model viewer if it’s only going to lie? The only thing correct is the area around the eyes.

…it looks to me, smoothing groups of your model are not set, and it looks like vertices are not welded/weighted…is this character rigged ?

Looks like you have an unshaded material in the first image, and a lighting material in the second. Also the normals seems completely wrong on the model.

Wait I remember that first model in thsit hread from somewhere :stuck_out_tongue:

Also trying out models from random not game ready sites is a pain, especially if you have not already sunk month into blender :slight_smile:

1 Like

The vertices weren’t weighted, but weighing them made no difference. Neither did applying smoothing groups. The character is not rigged.

That’s weird. Because in Blender the materials are the exact same thing. I didn’t touch them in the code, I only loaded the model, added a directional light, and placed them both in the root node. Ambient light doesn’t seem to work. And about the normals, that’s the texture I had to experiment with to get the effect I needed. If they are anything besides a solid bluish color, the effect is gone.

It’s Yandere-Chan from Yandere Simulator!

The thing is, this is a model I modified myself to be game-ready. He’s walking around in a different project. But I guess I never made Toad ready for this…

I may have to use a shader script. Does anyone know of any that gives the look I’m aiming for? If not, then I guess I’ll have to write my own… (gulp)

Use the “Unshaded” material if you want to achieve the look like girl.
Edit the material property in the jME SDK to achieve that.

You could also do it in Java code (see tutorial 6) Here are two links:
http://wiki.jmonkeyengine.org/doku.php/jme3:beginner:hello_material
http://wiki.jmonkeyengine.org/doku.php/jme3:advanced:materials_overview

The girl has a shadow - you would activate that in your game:
http://wiki.jmonkeyengine.org/doku.php/jme3:advanced:light_and_shadow
(also you can look in the Test project → File > New Project > jME3 > jME Test > start any of the .java files directly - then copy the code you like from the TestShadow examples)

I can’t exactly use that. Later on I plan on adding lights to the game to add lights and I am going to use the same base materials for every object in the game (with some variations here and there). Unless there is a way to mix “Unshaded” and “Lighting” together…

Hm… I don’t know what you are trying to achieve.
You can use “Unshaded” and “Shadows” together.
You could also make your own shader for “cell shader” (“toon shader”) effect.
That’s typically what you see in those 3D anime games and there are GLSL shaders for it.

I just found out about the Cell Shading. I’m looking into it right now. I’ll try to get another model ready, and then test any shaders I find. And then make my own so I don’t feel like I ripped people off. :smile:

Unshaded together with shadows and configured as “cast and receive” might look good too. There are some people working on the shadow system to make things like this look good.

A good thing in your project: You plan to give all your assets the same material (more or less) - so you could set the material in Java code for all objects and their geometries. This is a great advantage, because you can exchange the cell shader by a better one automatically. And you don’t need to worry about shaders in Blender etc. - just export with textures, no further care needed.

If you ask yourself how to make this: in jME there is a Visitor mechanism - just apply this to the root node (okay it’s not that easy, but quite easy).

I think I found a winner. The code can be found here: http://prideout.net/blog/?p=22
Let’s see how this works out… Although I’m going to make a new model from scratch since Toad has many issues with him already. If this works, then I’m crediting @Ogli for confirming my idea on Cell Shading. This, combined with a modified version of the “Lighting” material, should look great! Plus well made textures, but that’s a different story. Now I need to remember how I got rid of that shiny look I used to have with Toad…

So I’m putting the material definition together, and I spot the World Parameters. Are these the parameters passed into the shader scripts? That’s what it looks like to me. How should I rename the parameters in the shader scripts to match the ones in the material definition (IOW, which parameter goes to what?). I took the “Lighting” material, and changed the referenced shaders to the ones found in my previous post.

Nevermind, It’s much simpler to make my own material definition than to dissect an existing one. It’ll help with my training, anyway. Just one little question for now: How do I pass the LightPosition parameter in the fragment shader?

Okay, so I realized I’m going to have to port the borrowed code into code that works for jMonkey, and I’m a little stuck. I’ll post the shader scripts with comments to explain what I need help with.

My .vert file:

attribute vec3 inPosition; //Netbeans shows an "IDENTIFIER expected" error here, not sure why
attribute vec3 inNormal; //"IDENTIFIER expected"

uniform mat4 Projection; //not sure what parameters to replace these uniforms with
uniform mat4 Modelview;
uniform mat3 NormalMatrix;
uniform vec3 DiffuseMaterial;

out vec3 EyespaceNormal; //not sure if I can use the out function
out vec3 Diffuse;

void main()
{
    EyespaceNormal = NormalMatrix * inNormal;
    gl_Position = Projection * Modelview * inPosition;
    Diffuse = DiffuseMaterial;
}

And my .frag file:

in vec3 EyespaceNormal; //not sure if I can use the in function either, I need this parameter from the vert file
in vec3 Diffuse;
out vec4 gl_FragColor; //not sure if this is legal/necessary, "IDENTIFIER expected"

uniform vec3 LightPosition; //not sure what to replace this with. Does g_LightPosition work? "IDENTIFIER expected"
uniform vec3 AmbientMaterial; //not sure if I can pass a material into a vec3
uniform vec3 SpecularMaterial;
uniform float Shininess;

float stepmix(float edge0, float edge1, float E, float x)
{
    float T = clamp(0.5 * (x - edge0 + E) / E, 0.0, 1.0);
    return mix(edge0, edge1, T);
}

void main()
{
    vec3 N = normalize(EyespaceNormal);
    vec3 L = normalize(LightPosition);
    vec3 Eye = vec3(0, 0, 1);
    vec3 H = normalize(L + Eye);
    
    float df = max(0.0, dot(N, L));
    float sf = max(0.0, dot(N, H));
    sf = pow(sf, Shininess);

    float A = 0.1;
    float B = 0.3;
    float C = 0.6;
    float D = 1.0;
    float E = fwidth(df);

    if      (df > A - E && df < A + E) df = stepmix(A, B, E, df);
    else if (df > B - E && df < B + E) df = stepmix(B, C, E, df);
    else if (df > C - E && df < C + E) df = stepmix(C, D, E, df);
    else if (df < A) df = 0.0;
    else if (df < B) df = B;
    else if (df < C) df = C;
    else df = D;

    E = fwidth(sf);
    if (sf > 0.5 - E && sf < 0.5 + E)
    {
        sf = smoothstep(0.5 - E, 0.5 + E, sf);
    }
    else
    {
        sf = step(0.5, sf);
    }

    vec3 color = AmbientMaterial + df * Diffuse + sf * SpecularMaterial;
    gl_FragColor = vec4(color, 1.0); //pretty sure this is correct...
}

For the “IDENTIFIER expected” errors, is that Netbeans being buggy, or am I really doing something incorrect here? It would be great getting this script ported, because not only will it teach me more about how to write shaders, but it will also give me the exact look I am trying to achieve. I can’t find any other scripts around that do this without aliasing artifacts, which I don’t want. But yeah, can anyone help me with this please? The original code can be found here: http://prideout.net/blog/?p=22 The fragment shader I’m using is at the bottom of the page. The vertex shader is somewhere on the top.

Hello, I just found this wiki page: http://wiki.jmonkeyengine.org/doku.php/jme3:advanced:jme3_shaders

The trick is, that jME properties start with either “g_” or “m_” and that you will need to create a material definition ( .j3md file ) together with .vert (vertex shader) and .frag (fragment shader). Also, some knowledge about GLSL is needed.

Also I found that it’s called a “cel shader”, not a “cell shader” - cel is a technical term from classic animation techniques: Cel - Wikipedia

Actually, my port so far is the result of studying the wiki page for a long time. However, there are still parameters I need to change that I don’t know what to change them to. After studying them a bit more, and looking at some GLSL examples, I think I’m starting to find out what to do. I’ll post any questions if I run into any, and then upload the shaders once I get them working.

Sounds good. I’m looking forward to see the results. :chimpanzee_smile:

The anti-aliasing part of the cel shader you found is interesting. I need that for one of my projects too.

Hmmm, So I got the effect again, but I can’t seem to figure out how to get the fragment shader to take in my texture correctly. I pass a Diffuse map of a Mario block and try to apply the material to a cube, but it comes out plain white. And I don’t know what in my code I did wrong. I have a feeling it’s something stupid. Can someone help correct this bug? Here is my .frag code:

varying vec3 EyespaceNormal;
varying vec2 texCoord;

uniform sampler2D m_DiffuseMap;
uniform vec4 g_LightPosition;
uniform vec4 g_AmbientLightColor;
//uniform vec3 SpecularMaterial;
uniform float m_Shininess;

float stepmix(float edge0, float edge1, float E, float x)
{
    float T = clamp(0.5 * (x - edge0 + E) / E, 0.0, 1.0);
    return mix(edge0, edge1, T);
}

void main()
{
    vec2 newTexCoord;
    newTexCoord = texCoord;
    vec4 Diffuse = texture2D(m_DiffuseMap, newTexCoord);
    vec3 N = normalize(EyespaceNormal);
    vec3 L = normalize(g_LightPosition.xyz);
    vec3 Eye = vec3(0, 0, 1);
    vec3 H = normalize(L + Eye);
    
    float df = max(0.0, dot(N, L));
    float sf = max(0.0, dot(N, H));
    sf = pow(sf, m_Shininess);

    float A = 0.1;
    float B = 0.3;
    float C = 0.6;
    float D = 1.0;
    float E = fwidth(df);

    if      (df > A - E && df < A + E) df = stepmix(A, B, E, df);
    else if (df > B - E && df < B + E) df = stepmix(B, C, E, df);
    else if (df > C - E && df < C + E) df = stepmix(C, D, E, df);
    else if (df < A) df = 0.0;
    else if (df < B) df = B;
    else if (df < C) df = C;
    else df = D;

    E = fwidth(sf);
    if (sf > 0.5 - E && sf < 0.5 + E)
    {
        sf = smoothstep(0.5 - E, 0.5 + E, sf);
    }
    else
    {
        sf = step(0.5, sf);
    }

    vec3 color = g_AmbientLightColor.rgb + df * Diffuse.rgb + sf;// * SpecularMaterial;
    gl_FragColor = vec4(color, 1.0);
}

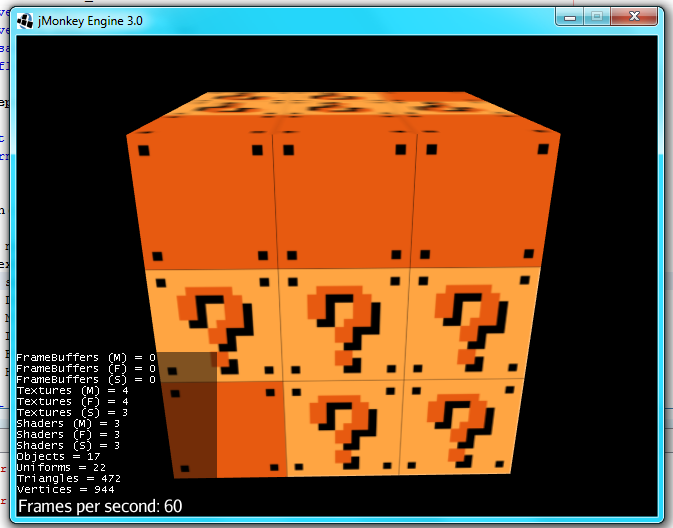
UPDATE: So I found out what I did wrong, I made the mistake of leaving out the Specular Textures. But now the fragment shader is placing the entire image on the cube, and not wrapping it around. How do I get it to stop?
What I am getting:


…And my fragment code:

varying vec3 EyespaceNormal;
varying vec2 texCoord;

uniform sampler2D m_DiffuseMap;
uniform vec4 g_LightPosition;
uniform vec4 g_AmbientLightColor;
uniform sampler2D m_SpecularMap;
uniform float m_Shininess;

float stepmix(float edge0, float edge1, float E, float x)
{
    float T = clamp(0.5 * (x - edge0 + E) / E, 0.0, 1.0);
    return mix(edge0, edge1, T);
}

void main()
{
    vec2 newTexCoord;
    newTexCoord = texCoord;
    vec4 specularColor = texture2D(m_SpecularMap, newTexCoord);
    vec4 Diffuse = texture2D(m_DiffuseMap, newTexCoord);
    vec3 N = normalize(EyespaceNormal);
    vec3 L = normalize(g_LightPosition.xyz);
    vec3 Eye = vec3(0, 0, 1);
    vec3 H = normalize(L + Eye);
    
    float df = max(0.0, dot(N, L));
    float sf = max(0.0, dot(N, H));
    sf = pow(sf, m_Shininess);

    float A = 0.1;
    float B = 0.3;
    float C = 0.6;
    float D = 1.0;
    float E = fwidth(df);

    if      (df > A - E && df < A + E) df = stepmix(A, B, E, df);
    else if (df > B - E && df < B + E) df = stepmix(B, C, E, df);
    else if (df > C - E && df < C + E) df = stepmix(C, D, E, df);
    else if (df < A) df = 0.0;
    else if (df < B) df = B;
    else if (df < C) df = C;
    else df = D;

    E = fwidth(sf);
    if (sf > 0.5 - E && sf < 0.5 + E)
    {
        sf = smoothstep(0.5 - E, 0.5 + E, sf);
    }
    else
    {
        sf = step(0.5, sf);
    }

    vec3 color = g_AmbientLightColor.rgb + df * Diffuse.rgb + sf * specularColor.rgb;
    gl_FragColor = vec4(color, 1.0);
}

I’m sure looking at the Lighting.frag file will help, but while I do that, does anyone have any tips themselves?

Yet Another UPDATE: My bad, the texture placement was due to the fact that in my test code I was using a pre-generated Geometry instead of an actual model. I think this thing is almost done, I just need to add more threshold values to make the color adjust less choppy and do some further testing.

So after some testing, I have confirmed 2 things. 1) This shader doesn’t work too well on flat surfaces, and 2) It treats every light as an Ambient Light. I may just post this shader on Git Hub, so that way I can get lot’s of help making this. You guys are welcome to come and improve it, just give me a sec and let me post it…

Alright, it’s up. The link to it is here: https://github.com/FloppidyDingo/JME-Anime-Shader/tree/master If you want to contribute, by all means go right ahead. Just send me your github user name and I’ll add you. I’ll add more to the repository later, when I have time.

1 Like