I design the architecture for my game where the main character should have an ability to change weapons, shields, helmets and armors (they protect only body – not feet and hands). There are no problems with the shields, swords and helmets. They are created as separate .OBJ files. When the model of the protagonist is loaded – I attach the weapon-Node to a special bone on the right hand and the shield to the special bone on the left hand. The helmet is attached to the scull-bone directly. Everything is good and I can replace these nodes when the user wants to take a new weapon/shield/helmet.
But I cannot find a way to attach a armor to the players-armature. The armor cannot be attached to a single bone – it is attached to the whole spine and some other bones (collarbones, thighbones). The armor is deformable.
I found only two ways.
Variant 1:
Create for every new armor a new 3D model of the protagonist with the already dressed armor. When the user wants to replace the body armor – I need to replace the whole 3D model and attach the weapon, shield and sword again.
Variant 2:
-
I create the animated model of the protagonist with a default armor (armorOriginal);
-
I export the whole model in JME3 using .GLTF-format.
-
I import the model of the protagonist inside JME3
-
I create another armor at same place of the coordinate system in Blender (armorNew).
-
I export this body armor as a separate .GLTF.
-
I import the model of the body armor inside JME3.
When I need to replace the body armor in the game-code, I do:
-
I found the node of the default armor (armorOriginal).
-
I extract vertexData of the original armor.
-
I attach this vertex data to the new armor (armorNew).
-
I attach the armorNew to the protagonist
-
I remove from parent the armor original.
Result: it works only, if the both armors have similar dimensions/meshes. When one of the meshes if large but the second is small – I receive the graphical bugs on the second. I think, it must exist another way to attach a node to the armature in according to the changed dimensions/mesh. I show the video what happens if the body armors have different meshes:

I show also the SceneComposer windows of the both models on the next picture.
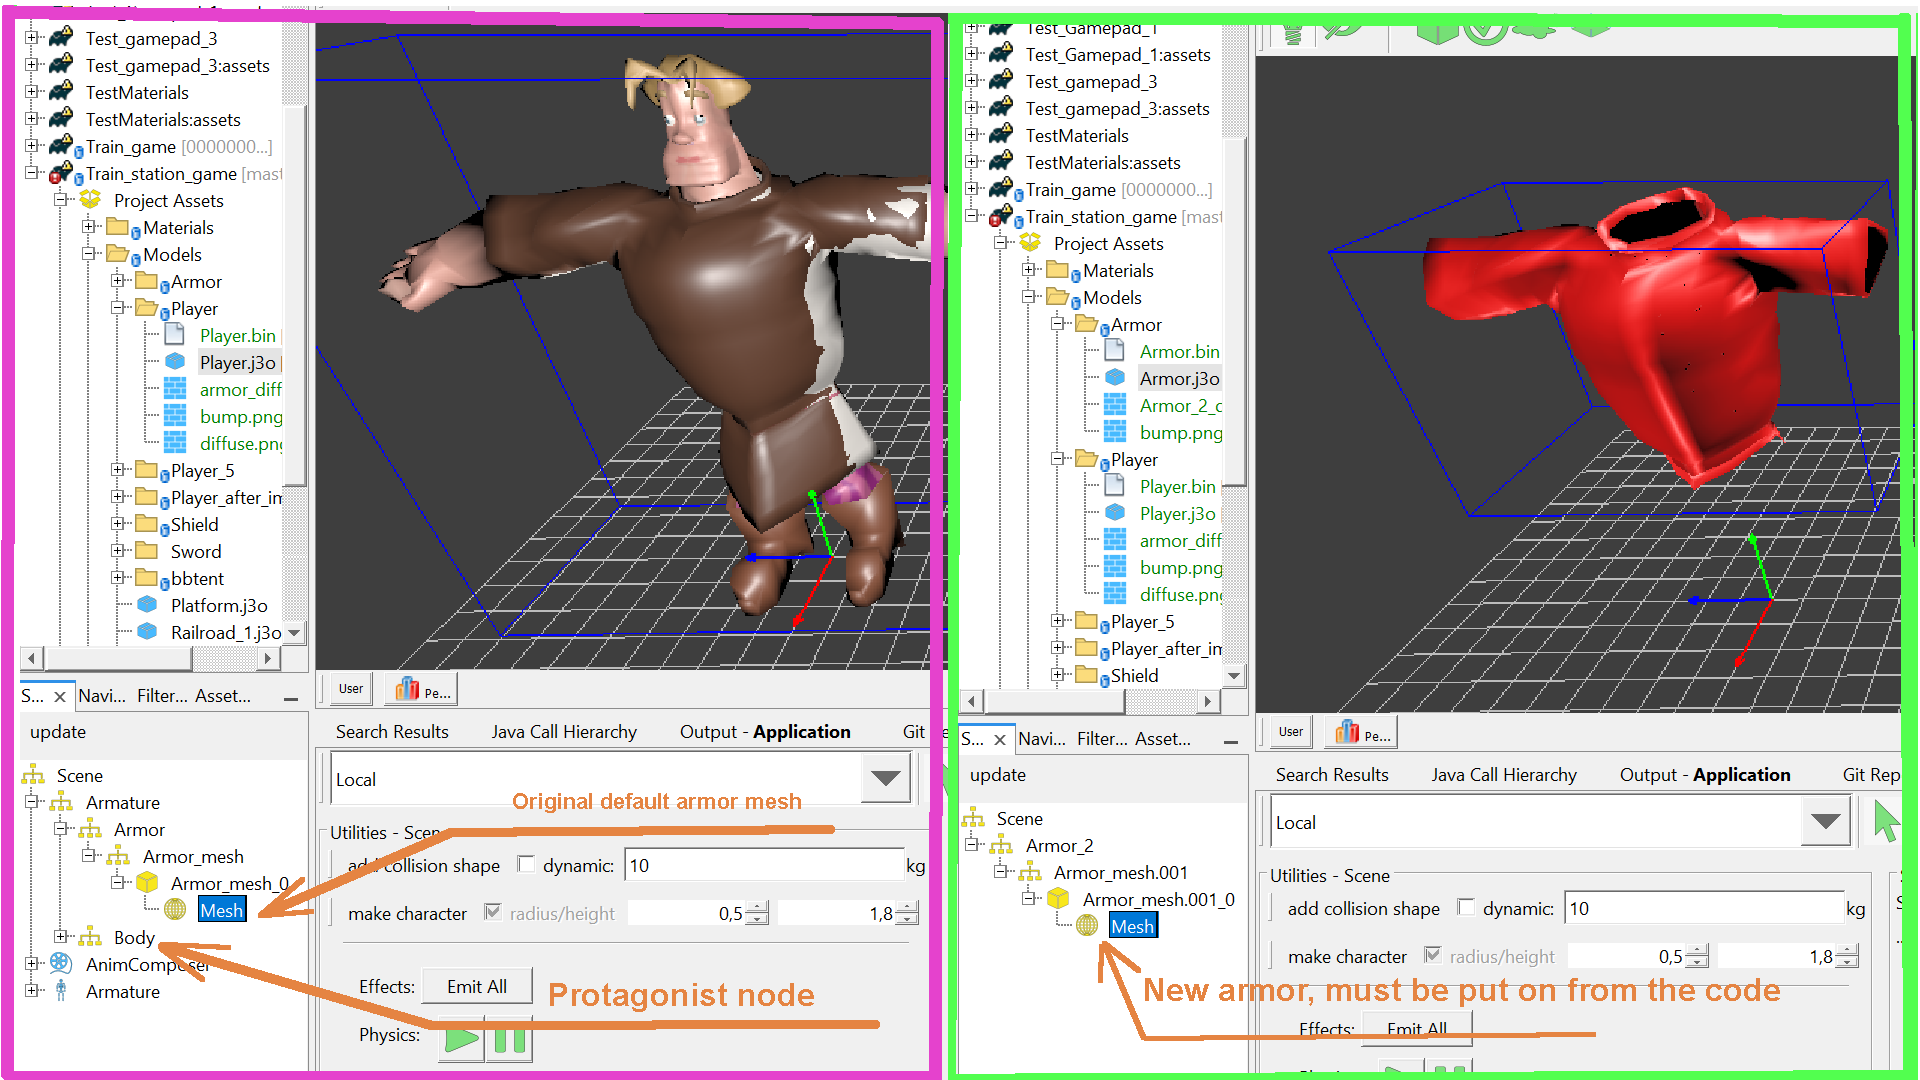
The code is below. It replaces the body armor every 1500 ms. The most interesting method is private void changeArmorVisibility(boolean toHide):
public class DesktopJmeSwapBodyArmor extends SimpleApplication implements WrapperLauncher {

    private Node player;
    private Node armorOriginal, armorNew;
    private ArmorManager armorManager;
    private Geometry lowLevelOriginalArmorGeometry, lowLevelNewArmorGeometry;   //not used
    private Mesh armorOriginalMesh, armorNewMesh;
    private boolean onceApplied = false;

    public static void main(String[] args) {
        var app = new DesktopJmeSwapBodyArmor();
        app.setSettings(createSettings());
        app.setShowSettings(false);
        app.start(); // start the game
    }

    @Override
    public void simpleInitApp() {
        GlobalVariables.initEngine(this);
        loadScene();
        loadPlayer();
        setCameraParams();
        armorManager = new ArmorManager(1500);
        findOriginalArmorMesh();
        findNewArmorMesh();
    }

    private void findNewArmorMesh() {
        var armor = (Node)armorNew.getChild("Armor_2");
        var armorMesh = (Node)armor.getChild("Armor_mesh.001");
        var armorMesh0 = (Geometry)armorMesh.getChild("Armor_mesh.001_0");
        var mesh = armorMesh0.getMesh();
        this.lowLevelOriginalArmorGeometry = armorMesh0;
        this.armorNewMesh = mesh;
    }

    private void findOriginalArmorMesh() {
        var armature = (Node)player.getChild("Armature");
        var armor = (Node)armature.getChild("Armor");
        var armorMesh = (Node)armor.getChild("Armor_mesh");
        var armorMesh0 = (Geometry)armorMesh.getChild("Armor_mesh_0");
        var mesh = armorMesh0.getMesh();
        this.lowLevelOriginalArmorGeometry = armorMesh0;
        this.armorOriginalMesh = mesh;
    }

    private void setCameraParams() {
        flyCam.setMoveSpeed(flyCam.getMoveSpeed() * 25);
        var cameraPos = getCamera().getLocation();
        cameraPos.y += 15;
        cameraPos.z += 25;
        cameraPos.x += 0;
        getCamera().setLocation(cameraPos);
    }

    private void changeArmorVisibility(boolean toHide) {
        if (toHide) {
            if (!onceApplied) {
                var clonedData = armorOriginalMesh.cloneForAnim();
                onceApplied = true;
                armorNewMesh.extractVertexData(clonedData);
            }
            armorOriginal.removeFromParent();
            player.attachChild(armorNew);
            Logger.debug("Original long brown armor detached. Short red is attached.");
        }
        else {
            armorNew.removeFromParent();
            player.attachChild(armorOriginal);
            Logger.debug("Short red is detached. Original long brown armor attached.");
        }
    }

    private void loadPlayer() {
        String path = WrapperPathsCreationUtil.getPath(false, false, "Models", "Player", "Player.j3o");
        player = (Node) assetManager.loadModel(path);
        ((Node) rootNode.getChild(0)).attachChild(player);
        enableAnimation(player);
        armorOriginal = (Node) player.getChild("Armor");
        String pathToNewArmor = WrapperPathsCreationUtil.getPath(false, false, "Models", "Armor", "Armor.j3o");
        armorNew = (Node) assetManager.loadModel(pathToNewArmor);
    }

    private void enableAnimation(Node player) {
        var composer = player.getControl(AnimComposer.class);
        composer.setCurrentAction("ATTACK_1");
    }

    private void loadScene() {
        String path = WrapperPathsCreationUtil.getPath(false, false,  "Scenes", "Level_-1_test.j3o");
        var scene = (Node) assetManager.loadModel(path);
        rootNode.attachChild(scene);
    }

    @Override
    public void update() {
        super.update();
        armorManager.update();
    }
}
ArmorManager is a simple nested class, which has only one timer (see below):
private class ArmorManager{

        private final MgdsTimer timer;
        private final int time;
        private boolean visibleOriginalArmor = true;

        private ArmorManager(int time) {
            this.time = time;
            timer = new MgdsTimer(time);
        }

        private void update(){
            if (timer.isTime()){
                timer.setNewTimer(time);
                visibleOriginalArmor = !visibleOriginalArmor;
                changeArmorVisibility(!visibleOriginalArmor);
            }
        }
    }
Help me please to find a right way to replace the meshes to save adequate animation possibility. Or maybe replacing the whole 3D-model is a single right way to do that?